How to assign a static ip address in Ubuntu Server
The default behaviour in a typical home network environment is that your router assigns a unique IP address to each of the devices (laptop, tv, smartphone, refrigerator) that connect to it. So, when a device attempts to connect to the network your router will assign it an address from a small pool of available addresses. It is therefore likely that as devices connect and disconnect, the address they’ll be assigned each time will not be the same as when they connected previously. This can be a problem when you’re connecting to a media server as the address it had previously may now be assigned to a different device.
There is a concept of “IP Address Reservation” where you tell your router to assign the same IP address to a particular device each time, thus removing that address from the pool so it’ll never be assigned to something else. However, not all routers support this. In addition, if you ever reset or replace the router you’ll have to remember to perform this step again.
I think a better idea is to give your server a fixed IP address. It’s a simple change to make once you have the relevant information to hand. However, exactly what the required changes are depends on which version of Ubuntu Server you’re running:
Ubuntu Noble Numbat 24.04LTS uses netplan
In versions 18.04LTS and later, netplan is the utility which controls network configuration rather than ifconfig. So, first we need to determine the existing settings that our server is using. We can do this by typing the following:
ip addr show
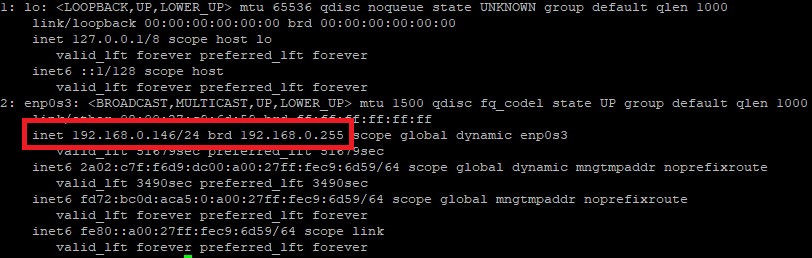
Make a note of the inet and brd values from the output. You can see that mine is 192.168.0.146/24 and 192.168.0.255 respectively.
Next, we need the default gateway. So, issue the following command:
ip route

From the above we can see my default gateway is 192.168.0.1
Next, you need your dns-nameserver. Issue the following command and note what you’re using currently:
sudo cat /etc/resolv.conf
Now we have all the information we need we can go ahead and change the IP address of our server from being a dymanic one, assigned by our router, to a fixed one. So, issue the following command:
sudo ls -l /etc/netplan
This will bring back a list of one of more files with names such as 50-cloud-init.yaml, 01-netcfg.yaml or 00-installer-config.yaml etc. Pick the file with the highest number at the beginning. I only had one file and that was called 00-installer-config.yaml so I issued the following command:
sudo vim /etc/netplan/00-installer-config.yaml
Obviously, replace the 00-installer-config.yaml part of this command with the name of the file on your system.
The file by default looks like this. Different versions of Ubuntu have slightly different variations:
# This is the network config written by 'subiquity'
network:
  ethernets:
    etho0:
      dhcp4: true
  version: 2
For our static IP address, we need to choose one which is outside the DHCP range of the router. You’ll need to go into the settings for your router to determine what this range is. On mine the range is 192.168.0.2 – 192.168.0.195. So, the range is all numbers between 2 and 195. For my server, I’m going to assign it an address of 192.168.0.200
To edit the file press the [Insert] key once to switch into edit mode.
Please note that this file is a “yaml file” and as such indentation is critical. The lines you need to add should be indented by 6 spaces so will appear beneath the p in eth0 as follows:
#This is the network config written by 'subiquity'
network:
  ethernets:
    eth0:
      addresses: [192.168.0.200/24]
      routes:
        - to: default
          via: 192.168.0.1
      nameservers:
        addresses: [127.0.0.45]
  version: 2
Obviously, you must substitute in the values you’ve determined from the commands above. You can see I’ve changed my IP address from the default one generated by my router 192.168.0.146/24 to 192.168.0.200/24 with 200 being outside the range issued by my router.
Once you’ve made the changes press the [Esc] key once and type :wq to save and quit out of the file. If you make a mistake, then issue :q! instead of :wq to abort your changes.
To make this IP address change take effect type the following:
sudo netplan apply
If netplan spots an error in your configuration file (eg. the indentation is wrong) it will tell you. Simply fix the issue and re-run the sudo netplan apply command once more.
If you did the above from a Putty Session you’ll need to re-launch Putty and connect to your server using the fixed IP address you’ve just assigned it.
Versions prior to Ubuntu 18.04 LTS
Versions before 18.04LTS use ifconfig. So, issue the following command to bring up the current network settings:
ifconfig
You need to make a note of the broadcast & netmask settings which are referred to as Bcast: & Mask: respectively.
ifconfig is not installed by default on some versions of Ubuntu
ifconfig is part of net-tools which we can install as follows, rebooting the server afterwards:
sudo apt install net-tools && sudo reboot -h now
We also need the gateway setting. We can find out what this is by issuing the following command:
route -n
Note the Gateway value in the second column on the line starting 0.0.0.0
Next, you need your dns-nameserver. Issue the following command and note what you’re using currently:
sudo cat /etc/resolv.conf
Lastly, we need to use an IP address which is outside the DHCP range of your router. You’ll need to go into the settings for your router to determine what this is. Once you have it issue the following command on your server:
sudo vim /etc/network/interfaces
and press Enter. This will open the file using vim and the contents will probably look something similar to this:
# This file describes the network interfaces available on your system
# and how to activate them. For more information, see interfaces(5).

source /etc/network/interfaces.d/*

# The loopback network interface
auto lo
iface lo inet loopback

# The primary network interface
auto eth0
iface eth0 inet dhcp
Now press the press the [Insert] key once to switch into edit mode and edit the file so it looks like this:
# This file describes the network interfaces available on your system
# and how to activate them. For more information, see interfaces(5).

# The loopback network interface
auto lo
iface lo inet loopback

# The primary network interface
auto eth0
# iface eth0 inet dhcp
iface eth0 inet static
    address 192.168.0.200
    broadcast 192.168.0.255
    netmask 255.255.255.0
    gateway 192.168.0.1
    dns-nameservers 192.168.0.1
obviously substituting in the values you’ve determined from the commands above. Don’t forget to mask out the iface eth0 inet dhcp line.
Once you’ve made the changes press the [Esc] key once and type :wq to save and quit out of the file. If you make a mistake, then issue :q! instead of :wq to abort your changes.
Then cross your fingers and reboot your server. Once it’s rebooted your server should now have a fixed IP address. So, don’t forget to use this new address in your Putty Session when you now connect to your server.